Brewing Water - Building from R/O

I recently had my water tested, and based on the report (because of excessive salinity and alkalinity) decided to convert my brewing liquor to Reverse Osmosis (R/O) water with mineral additions. I should share my process because I have learned a lot about this in a short time (but still not a chemist) and can hopefully help someone else who may be considering the same, but is a bit nervous. This is timely as I am also reading the new "Water: A Comprehensive Guide for Brewers."
I am now unsure why I was terrified of adding mineral salts to the water in the past. The core of the fear was based on confusion, a bit of chemistry knowledge, and the utter frustration I had previously had in hitting a proper mash pH. As well, the information I got from my local water provider was just plain unbelievable. Rather than getting into the chemistry, which I will get wrong, let's just hit the high points.
Mash pH is critical to ensure starch extraction and conversion to sugars by enzymes released by hydration of the grist. Particular temperature ranges favor certain enzymes and require an optimal mash pH of 5.2-5.6. Notice that the MASH, not the WATER (liquor) pH, is critical. It happens in the mash when the crushed grains are hydrated, and the minerals in the grains and husks affect the pH. Often, one may need to add liquid acids or a base mineral, such as pickling lime, to achieve a reasonable pH.
Have a good pH meter handy and take measurements right after dough in, and throughout the mash process. Cool the samples to room temperature before taking the readings, even with an ATC meter. A bowl in an ice bath can quickly chill a small 2-3-ounce sample.
Mineral salts, however, are used primarily for flavor; they also have the added benefit of being acid or base, which can influence mash pH. Burton-on-Trent is famous in the brewing world for extremely hard water with a very high mineral content. This water has helped shape the flavor profiles of bitters and porters from that area.
General rule of thumb: Sulfate favors bitterness and dryness, Chloride favors malty flavors and more body. Brewing liquor alkalinity is more critical than its pH... get that water analyzed or use R/O!
First, we plan. If I am going to make an IPA, I will target a very high sulfate level and a lower calcium chloride ratio. If it is a maltier style, I suggest swapping those around for a lower-sulfate ratio. So the style drives the water additions, which makes sense, since many styles are "local" expressions of traditional water sources. With R/O water, we have an essentially clean slate to mimic those sources. The caveat here is that information about those sources often fails to explain how the water is processed at the brewery and may not address seasonal changes, making research even more critical. If you are trying to make a clone, you may need to brew-test batches and adjust the additions to tweak the final profile.
Bottom line: when brewing with R/O water, mineral additions are critical to the recipe.
With the release of Palmer and Kaminsky's "Water, A Comprehensive Guide for Brewers," we should see some refreshes to concepts such as residual alkalinity and chloride/sulfate ratios, as well as brewing to regional water profiles. I have just started the book, so I won't be able to comment on it now, but I will be reading with an open mind.
Then, we track and observe the results. Here is the fun part for me... tasting. Martin and AJ, resident water experts at homebrewtalk.com, often recommend adding minerals to finished beers and then tasting them. This is a fascinating way to see how specific salts and balances directly affect flavor. I recently brewed a pretty flabby pale ale, sat with it, and added calibrated amounts of gypsum to raise the bitterness. It took a LOT more gypsum than I thought it would, which leads me to choose a much more aggressive bitter profile for my next pale ale. This also works with Epsom and Calcium Chloride, and will also affect the final pH of the beer. This helps drive elements like bitterness, as well as dryness, mouthfeel, and body. Keeping good records and frequent brewing will help you dial in the correct and preferred rates for your brewery, and deviate from the recommended profiles based on your preference and experience.
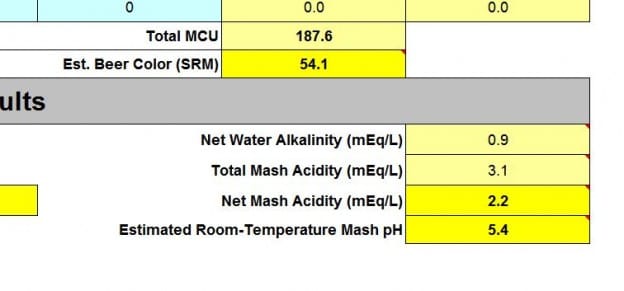
Since many of the mineral salts we need are acids, it benefits us to help drive the mash pH down (for light beers), but we often need only a portion of the additions to do so. This helps eliminate the need for liquid acids (such as lactic or phosphoric). It may also require alkaline additions, such as baking soda or pickling lime to raise the pH in the presence of acidic roast and crystal malts for darker beers. Finding this balance is where a spreadsheet simulation is constructive.
I use the "Bru'n Water" spreadsheet to model my mash pH and keep a detailed record of my additions. This works wonderfully, and a tab lets me cut/paste the additions into BeerSmith for record-keeping. Each beer will get a dedicated spreadsheet and be named appropriately: "WitorWitoutYou_brunwater.xls" so it is easy to find. I even keep these in Google Docs or Dropbox so I can share them across my devices, which makes them handy. I plan to do a walk-through on how to use Bru'n Water - although it is not all that complicated.
If you like and use that spreadsheet, please donate. He will email you a more capable spreadsheet and upgrades - it is donation-ware, so not expensive, and supports Martin's brewing focus work (not his day job).
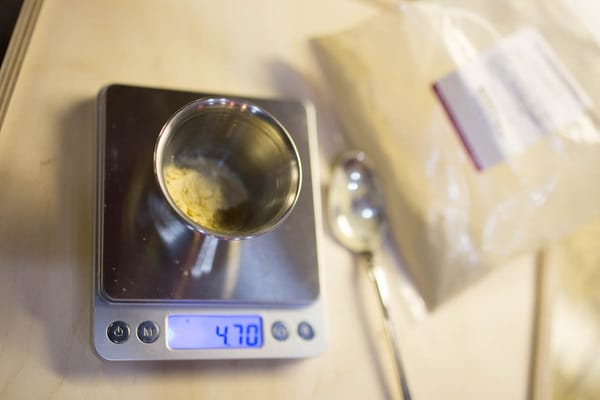
Careful measurement! I use a jeweler's gram scale with a tolerance of +/- 0.001 grams. Once I have my calculated additions for mash and sparge/boil, then I take the time before the busy brew day to very carefully weigh out each mineral addition. I like to use a folded piece of parchment paper, wrap it with a label, and then put it into a zip-lock bag. Usually, we are taking just a few grams of minerals total for a 10-gallon batch, so it is essential to be accurate - for the sake of consistency. At these weights, a portion of a gram could throw off 20-30% of your measurement.
Come brew day, when I start heating my strike and sparge water, it is easy to grab my little packets then and toss them in before the dough-in. I even dunk the parchment to get the last few crumbs.
A note: Martin recommended adding my additional salts to the sparge water rather than the boil kettle, rather than using acid to hit a sparge pH. This is more convenient, and just brewed with this process, so I cannot comment on anything other than a convenience factor yet. It should certainly prevent the pH from rising during sparging and risk tannin extraction. For dark beers, at the dosing rates we are talking about, we shouldn't fear the lime or soda solution too much... keep an eye on the Sodium levels.
As mentioned, I'll be sure to do a walk-through tutorial of Bru'n water at a later date so that you can see the tool in application. There are other spreadsheets, and I suggest picking one and sticking with it - even comparing it to other spreadsheets. Hang out in "Brewing Science" at Homebrewtalk.com, and you will learn quite a bit about water chemistry.
At the end of the day, my conclusion is that I cannot brew without mineral additions, any more than I can cook without salt. They make or break my beers... and while I am still learning, the difference in just a few brews has been tremendous!